Attracting Native Birds to Your Garden

Native birds are an important part of many ecosystems, pollinating plants, seed dispersal, and insect and rodent control. By attracting more native birds to your lawn, you will help keep your local ecosystem balanced. But how can you attract these native birds to your garden?

Birds native to each region

In different regions you can expect to see different types of native birds.

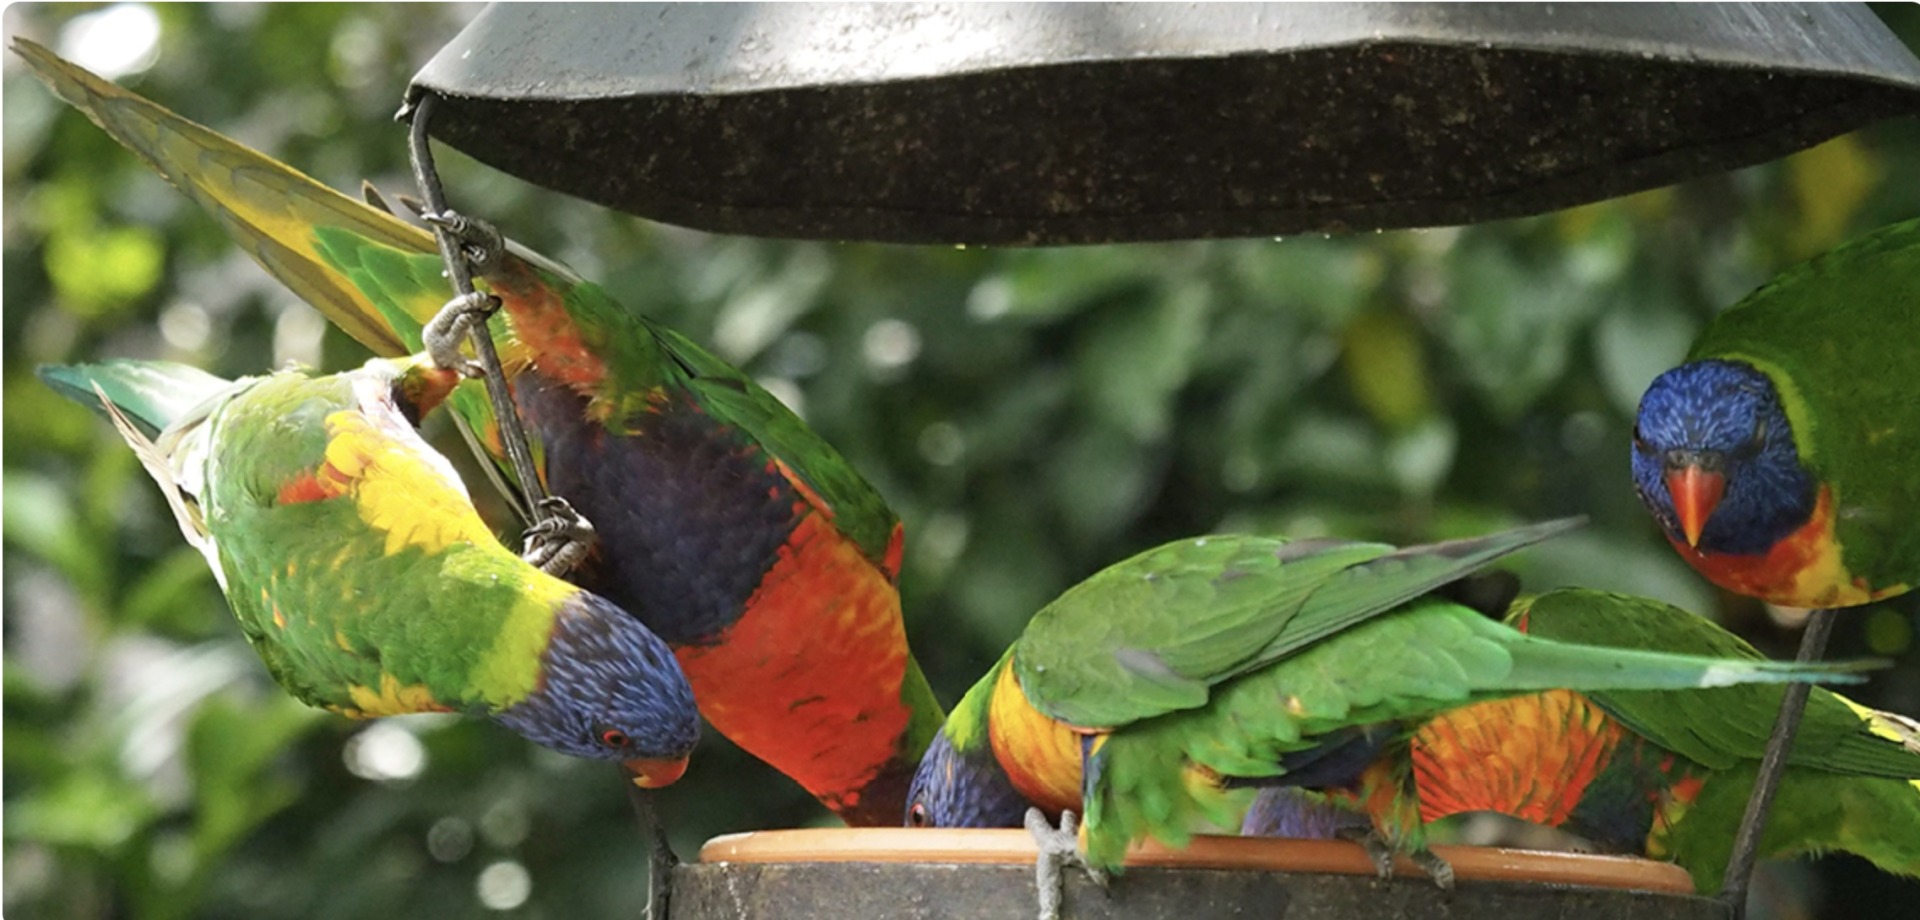
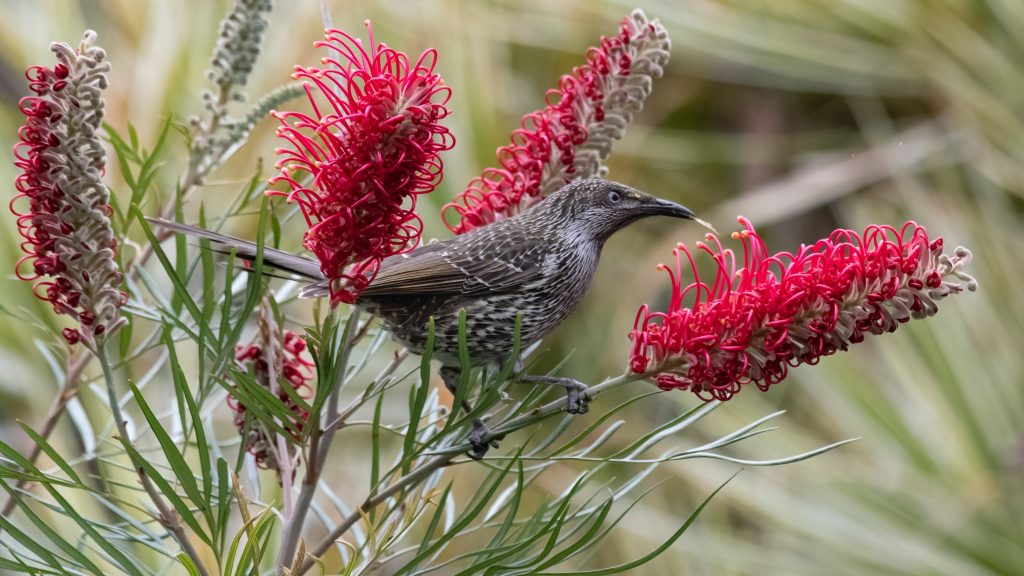
In Sydney, some native birds you can see outside the city include Nankeen kestrel, Superb fairy-wren, Rainbow lorikeet, Red wattlebird and more.

Native birds you can encounter in Melbourne include White-plumed honeyeater, Bell miner, Eastern rosella, and more.

For more information on what nativebirds you can find in your backyard, check out the Australian Museum page here.

Plant native plants around your lawn

Using a variety of native plants in your garden will help create a comfortable environment to attract native birds to your area. When planting to attract birds, we recommend using a variety of low lying and medium size shrubs and high trees. By using a variety of plants, you will provide more options for all bird sizes on your area.

Low growing plants will help attract many smaller native birds like Wrens and Finches and members of the Honeyeater family.

Medium shrubs provide a safe place for many smaller birds as they can provide a place to hide from danger.

If space allows high trees provide a high vantage point for birds allowing them to feel safe as they can see their surroundings and food sources.

Different native plant options include Grevilleas, Bottlebrush, Banksias and Gum Trees.

Some native plants are better suited to different regions of Australia, so it is best to chat with your local nursery to see which plants are suited to your region.

Bird baths and water features

Birds are attracted to areas with water. Bird baths as the name suggests provide a place to bathe and drink and socialise. Bird baths are best placed near surrounding trees and shrubs and placed off the ground. This will help them feel safer with their surroundings. It is also best to add a few rocks or sticks in the middle of the bird bath to help make it easier for smaller birds to use. Keep your bird bath clean with fresh water will help make it a more attractive place for birds to stop

Did you know that birds are also attracted to running water? The sound of moving water can attract birds to stop and drink, rest and bathe. If your budget allows, it can be a great feature for us to enjoy and the birds too!

Nesting boxes and nesting material

If you have large trees in your garden, you might want to try adding nesting boxes! These will provide a space for birds and other animals to live, rest and take refuge. You can buy nesting boxes from a local garden or hardware store or even build your own!

We also recommend leaving out nesting material like sticks, grass clippings and fallen leaves for birds to use.

As always, if you have any more questions please don’t hesitate to contact us for free expert advice on 1800ALLTURF (1800255873) or 07 5543 8304.

How to Fix Tyre Marks in Lawns

Do you have unattractive tyre marks in your lawn? In this blog, we look at a few methods you can use to help repair these, plus tips on how to avoid ruts from occurring.

What causes tyre marks or ruts?

Ruts can occur when objects like cars, motorbikes and even the kids’ bikes move over grass with saturated soil. When this happens, the soil can often sink and become compacted, creating divots.

Assessing the damage

The first step is to assess the damage. Are the ruts only shallow (up to 10 cm deep) or deep (over 10cm deep)? After you have determined this, we can look at the best way to repair it.

Small ruts

Small ruts up to 10cm deep can be fixed by loosening up the soil base below the lawn.

To do this, use a garden fork and insert it underneath the rut. Then pull the fork down, lifting the turf back up. It is best to lift the affected turf a few cm above the unaffected turf so it can level out over the coming days. Continue to do this around the affected area.

Big ruts

For larger ruts there are a few extra simple steps to follow.

Firstly, use a spade to cut 3 sides along the rut. Then lift and fold the grass over so you can access to the soil underneath the rut. Then use a garden fork or your spade to loosen up the soil underneath. If your soil is not level after this, bring in some sandy loam or turf underlay to bring the soils level back up. Then you can fold your turf back onto the soil and let it grow back in

If the turf in the rut is badly damaged, you may want to look at using a few turf rolls from your local turf supplier. When doing this, it is best to use the same variety as your existing lawn. Cut the turf to the required size and lay it over the prepared soil.

After repairing your rut, it is important to keep traffic in the affected area to a minimum while the grass is repairing itself and irrigate regularly. In winter, most warm season grasses like buffalo, couch, kikuyu and zoysia will need the warmer temperatures in spring to start repairing. In spring, you can also give these areas a fertilise to help promote extra growth.

How to avoid ruts in your lawn

The easy answer, stop people driving and parking on your lawn.

Roping off your area is an easy way to help stop others driving on your lawn. You can place small stakes into your grass and tie rope to them. This will act as a small reminder to others to not drive on your lawn.

Another option is to add a sign on your lawn to keep off the grass. Like this one available at Bunnings.

As always, if you have any more questions please don’t hesitate to contact us for free expert advice on 1800ALLTURF (1800255873) or 07 5543 8304.

How to Back Lap a Cylinder Mower

If you have a cylinder mower, a sharp reel is important to ensure a nice clean cut to your grass. But, do you know how to Back Lap a Cylinder mower? This blog looks at how to sharpen the blades on a cylinder mower.

What is back lapping?

If your reel and bedknife are not working as they should, your grass blades will be torn rather than cut. This isn’t great for the appearance of your lawn and is also not ideal for plant health.

Back lapping is the process of maintaining the sharpness of your cutting cylinder blades. This helps to ensure your reel and bedknife are bedded together and cut evenly, providing a sharp and even cut. Once the cylinder edge has been lost, you will need to have the cylinder re-ground.

Before you undertake the following back lapping process, it’s extremely important that you handle the machine safely and wear suitable protective equipment. Make sure you are wearing gloves, you are not wearing any bagging clothing, particularly long sleeves, and have a safe working area clear of clutter and away from others.

cylinder mowers

Step 1 –

The first thing you want to do is make sure that the machine won’t function. Turn the on/off switch to off and for extra safety remove the spark plug.

Step 2 –

Tip the cylinder mower backwards so that the reel and bedknife are easily accessible.

Step 3 –

Use a Mill Bastard file to take the round edge off the bed knife. As you do so, move the cylinder reel away from the pinch point. Using the file to put a sharp cutting edge on the leading edge of the bedknife.

Step 4 –

Use a cordless drill or back lapping machine and socket to turn the cylinder reel backwards.

While it is spinning, wet down the reel and bedknife lightly with water. A spray bottle will make this easier to get a nice even coverage of water across all elements.

Step 5 –

Next, apply back lapping compound or paste. This paste is a water-soluble grinding paste designed specifically for sharpening blades.

Apply back lapping compound evenly using a small to medium-sized paintbrush with a long handle while the reel is spinning. Using a piece of PVC pipe over the handle can help extend the length of the handle so your hands are kept at a distance from the blades.

The brushes only need to flick the reel blades as they spin lightly brushing as it goes around. Do not allow the brush to enter too far into the cylinder.

Important note: It is extremely important you are paying full attention while doing this and keep your hand as far away from the spinning reel as possible.

It is suggested to allow the cylinder to spin backwards after applying the grind paste for 5 minutes.

Step 6 –

Once the blades have been coated, wash off the paste using a hose.

Step 7 –

Adjust the cylinder position evenly to the bedknife, ensuring both sides and just touching the bedknife and the cylinder is spinning smoothly and not too tight.

Make sure the cylinder adjustment lock nuts and loosen prior to adjusting.

Step 8 –

Check with paper for sharpness. Checking cutting cleanly right across all the reel blades. The paper should cut easily like it would when using sharp scissors.

Once you have completed this process spray your cylinder, bedknife and other moving parts with WD40 or a lanolin spray like Inox to stop corrosion and rust. 

Now you know how to Back Lap your Cylinder Mower. You should now have your cylinder perfectly balanced, sharp, and ready perfectly cut your lawn.

For more lawn care tips and advice, check out our other lawn care blogs here.

As always, if you have any more questions please don’t hesitate to contact us for free expert advice on 1800ALLTURF (1800255873) or 07 5543 8304.

How to give your lawn mower a service

Whilst we know that it is important to have our cars serviced regularly, we usually forget the importance of giving our lawn mowers a service.

Looking after your lawn mower can be an important part in caring for your lawn as well. Without your lawn mower performing at its best, your lawn can end up with inconsistent heights, be torn rather than cut, contaminated with weeds and other grass varieties, and even go unmown if you are unable to get the mower started when it is needed.

Here are 8 tips for a lawn mower service

  • Clean your lawn mower

Often overlooked, but definitely important if you want your mower performing at its best. For most of the body of the mower, all you need is some soapy water and a brush. For the undercarriage, giving your lawn mower a good hose down and scrub with a metal brush will ensure the build-up of grass and dirt is removed. You can then use degreaser and a rag to get into all the small components around the engine to remove grease and dirt build-up.

  • Clean your air filter

Remove the air filter and give it a tap to remove any dust or build up. If it is particularly dirty, you are best to replace it with a new one.

  • Change your spark plug

A common cause for many lawn mower issues and an easy problem to fix. Remove the spark plug and clean the thread and lubricate with a small amount of oil before putting back. Replacing your spark plug every 12 months will help to avoid spark plug failure and help to ensure a quick start and a smoother running lawn mower.

  • Sharpen/replace your blades

One of the most important steps in servicing your lawn mower that can substantially affect the health of your lawn. Change your blades at least once a year and keep them clean of debris. A good sharp blade will ensure the grass blades are cut rather than torn, which is important not only for the appearance of your lawn but for the health of the leaf.

  • Check the oil (four-stroke engines only)

If you have a four-stroke lawn mower, you will need to check the oil. Make sure you always have your oil filled to the optimum level. Once every 12 months you should drain your oil, replacing your oil filter at the same time and fill with new oil. Doing so will help your engine to run smoother and prevent problems with your engine and pro-long the engine life.

  • Lubricate – Throttle cable, height adjuster, wheels and other moveable parts

Using a water dispersant (WD-40) apply to all moving parts to help them move freely and efficiently. Apply grease to any grease points, the height adjuster and other parts where required. See your manual for specific instructions for your lawn mower.

  • Check you have fresh fuel

Fuel goes stale after about 30 days, so use a fuel booster, or have the fuel drained if it has been in there for longer and the lawn mower is running poorly.

  • Check your pull cord is not stretched or fraying

Replace your pull cord if it is likely to break or if it is not wound correctly within the spool. This will save you a lot of time and frustration when it comes to starting your lawn mower if your pull cord is to fail.

By following these lawn mower service tips, your mower should be in tip top shape and ready to tackle your lawn with ease.

Remember to check your manual for specific maintenance instructions for your lawn mower.

As always, if you have any more questions please don’t hesitate to contact us for free expert advice on 1800ALLTURF (1800255873) or 07 5543 8304.

Soursob

What is a Soursob?

Scientific name: Oxalis pes-caprae

Soursobs are regularly confused with creeping Oxalis due to their very similar leaf appearance. Soursobs spread with large heart shaped leaves along the ground, producing flowers with 5 petals and have a long white tuberous root. Cooler conditions are when Soursobs like to appear in Autumn and Winter. The problem with Soursobs is that they are extremely resilient to herbicides and have a fast-growing system of onion like bulbs growing beneath the surface. In addition to this, they have small secondary bulbs known as bulbils. These bulbils are attached to the root system and each Soursob can have as many as 20 bulbils! When you remove the plant, the bulbils are left behind that then detach and grow into a new plant and the cycle continues.

One of the most important things to do is to try and target Soursob before it flowers. It is when it is flowering that the bulbils are growing and creating more plants.

Flowering times:

  • Winter to spring in western NSW.
  • June to October in SA. (In SA 1.25 million hectares are infested!)
  • June to October in WA.
  • Mainly June to November in SE Australia.
  • It does occur in QLD but dies out over time.

How to remove Soursob

Completely eradicating Soursobs from your lawn will take a bit of time and effort. Unlike many other weeds, it is not recommended to remove them by hand, as the bulbils will break off and continue to grow beneath the soil allowing it to reappear. There are also no selective herbicides readily available for domestic lawns that will target the Soursobs, so you will need to take a few other steps to try and remove it. Mowing them off regularly will weaken the plant helping your grass to overcome the infestation. Bulb exhaustion occurs just before flowering, so this is the perfect time to implement your mowing and non-selective herbicide application, when the plant is weak. This is the only stage that physical removal will be an option, by digging up under the plant and removing the soil around it as well.

You will be able to tell the plant is at the exhaustion stage if you carefully dig up a plant – the adult bulb will be shrivelled and the root under the bulb won’t have grown yet or is extremely young and thin. Spot spraying carefully or using a weed wand with an application of Glyphosate (Round Up or Zero) will be your best course of action, but you must be careful when applying as it will kill your turf as well. Acting quickly will also help you to stop them in their tracks before they produce more bulbils.

As always, if you have any more questions please don’t hesitate to contact us for free expert advice on 1800ALLTURF (1800255873) or 07 5543 8304.

Preventing a grub attack | Acelepryn GR

Armyworm, African Black Beetle larvae (lawn grubs), Cutworm, and other grubs can all quickly cause extensive damage to your lawn. But what if there was a way you could prevent these damage causing grubs from crawling throughout your lawn? Well, Acelepryn GR or Grub Guard Ultimate is your answer!

Prevention is the best solution

Grubs will often target the healthiest looking lawn on the street as their next tasty meal. When lawns get attacked by grubs, they often will have already created extensive damage before being noticed. Following an attack, the lawn can take a few weeks or a few months to fully repair itself. Instead of going through the long process of nursing your lawn back to health, prevention is a far better solution.

What is Acelepryn GR?

Acelepryn GR is an insecticide that provides your lawn with 6 months of protection from grubs and caterpillars like Armyworm in one single application. Acelepryn GR works by targeting a specific muscle receptor that is common with damaging causing insects. Other non-target organisms like bees, earthworms, birds, fish, and mammals don’t use the same muscle receptors, making it one of the safest insecticides on the market!

acelepryn
ACELEPRYN GR

What is Grub Guard Ultimate?

Lawn Solutions Grub Guard Ultimate Turf Insecticide delivers excellent preventative control against a large range of common lawn pests.

Optimal results are achieved when applied early in the season at the appearance of overwintering adult pests.

This 4kg bucket will cover up to 500m2

The long residual performance of Lawn Solutions Grub Guard Ultimate Turf Insecticide will provide up to 6 months of protection at the higher application rates.

Curative control of pest outbreaks later in the season can also be achieved using the higher recommended application rates.


acelepryn


Grub Guard Ultimate prevents and treats a broad range of lawn pests including:

    • Lawn Armyworm
    • Lawn Curl Grub (African Black Beetle Larvae)
    • Argentine Stem Weevil
    • Blllbug Larvae
    • Sod Webworm

When should you apply Acelepryn GR?

As a general guide, Acelepryn GR is best used in September/October and March/April to prevent a grub attack year round. One application of Acelepryn will provide you with protection for up to 6 months. So, two applications per year will ensure your lawn is protected from grubs throughout the whole year.

How to apply Acelepryn GR?

For treating beetle larvae including African black beetle, Argentine Scarab, Argentine Stem Weevil larvae and Billbug Larvae, spread the granules evenly, 1-2kg per 100m2. We recommend using a calibrated spreader to ensure the granules are spread evenly to the lawn. You can also spread the granules by hand. After the granules have been spread out, give the granules a water in with a minimum of 3mm irrigation.

For Caterpillars including Cutworm, Armyworm, and Sod Worm, spread the granules evenly, 1kg per 100m2. Again, we recommend using a calibrated spreader for an even application. You can also spread the granules by hand. After application, delay mowing and watering for 24 hours. After 24 hours have passed, water the granules in.

spreading fertiliser

Common signs of grubs

When grubs are present in your lawn, they will eat through your lawn’s roots. As the turf can then no longer absorb nutrients, the grass will become dry and straw like. When there is an infestation, large areas of the lawn will be affected quickly.

How do I know if my lawn has grubs?

If you think your lawn may already have grubs, it is best to do a quick lawn grub test. To do this, mix a bucket of soapy water and pour it over the edge of an affected area. Keep an eye on it and after about 10 minutes or so, usually if there are grubs there, they will come to the surface. This is best done at dawn or dusk when grubs are most active.

Lawn Grubs
BLACK BEETLE LARVAE

What to do if you already have grubs?

If your lawn already has a grub infestation, it is best to act quickly to help prevent further damage. Delaying treatment can cause a substantial amount of damage as the grubs will move fast along the lawn while laying eggs and increasing in numbers.

After you have identified there is an infestation, we recommend using a fast-acting product for a quick knockdown. We recommend using Lawn Solutions Grub Guard or Battle Insecticide to get the job done quickly. When using insecticides, it is always best to check the label for application and safety instructions.

The best time to apply the treatment is in the late afternoon/dusk when the lawn grubs are most likely to be active. To ensure you have treated the full lifecycle of the grubs, apply a second treatment in 2 weeks. This will help ensure that any eggs that may be in the lawn have been treated, avoiding a second attack. If you do still see these grubs after this, reapply every 2 weeks until they are gone.

Grub Treat and Protect Bundle

Protect your lawn from lawn pests with this one-two punch to treat an existing infestation and to protect your lawn for up to 6 months. If you have noticed damage to your lawn caused by black beetle larvae or Army worm, this bundle provides Grub Guard for a fast knock-down treatment, along with Acelepryn GR – the best product on the market for lawn pest prevention in lawns.

As always, if you have any more questions please don’t hesitate to contact us for free expert advice on 1800ALLTURF (1800255873) or 07 5543 8304.